by Amy S.
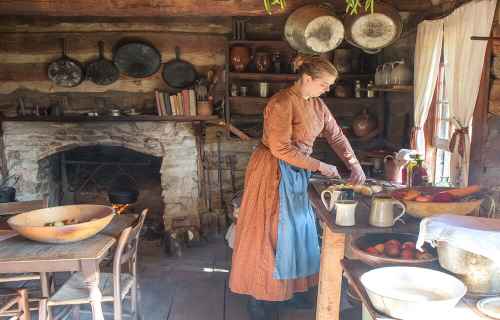 Pioneer women who had to decide what few precious things to carry across the plains surely made one choice in common—their own individual collection of “receipts,” as recipes were then called. For them, these were reminders of a security left behind and a hope for the abundance of the future. In the interim, they simply did what they had to do to keep their families alive.
No doubt the “receipt” books were closed during these times, and efforts were given simply to finding food and making it go as far as possible.
But slowly, even out of this deprivation, recipes grew. The pioneer women learned to use any small pieces of leftover meat and poultry with such vegetables as they might have on hand—carrots, potatoes, corn, turnips, onions—to make a pie smothered with Mormon gravy.
Thrift fritters were a combination of cold mashed potatoes and any other leftover vegetables and/or meat, onion for flavoring, a beaten egg, and seasonings, shaped into patties and browned well on both sides in hot drippings.
Undoubtedly recipes passed from hand to hand. Recipes for steamed Boston brown bread were probably exchanged for those for Oklahoma graham gems, while German Saints taught the Welsh how to make their spiced red cabbage and learned in return how to make Welsh currant bread. Truly, the cooking pot of the early pioneers was a melting pot for many kinds of cooking from many countries and ranged from the simplest and most humble of recipes to elaborate and elegant dishes from the kitchens of European kings.
Early diaries are filled with happy reminiscences of work and fun: salt-rising bread mixed in mother’s “baking kettle” while traveling in the wagon, then baked over the campfire at night; bacon and sour-dough pancakes cooked over campfires; molasses taffy pulls made possible by generous dippings from the skimmings of molasses boilers; peach preserves cooked in the last of the molasses batch and stored in big barrels; fruits and vegetables dried for winter storage; buffalo pie and wild berries; raspberry and currant and gooseberry bushes planted near the house, yielding fruit quickly and easily.
Drying Foods to Preserve Them
Today we understand that moisture allows for the rapid microbiological growth of bacteria, which is present in all fresh foods and which causes them to decay. But it isn’t necessary to understand the chemical process involved in order to observe that food that is wet and left in the open will quickly start to smell and attract bugs. So it should come as no surprise that one of the oldest methods of preserving foods known to man is that of drying it.
Drying was used to preserve all sorts of foods. Grains like rye and wheat were dried in the sun or air before being stored in a dry place. Fruits were sun-dried in warmer climes and oven-dried in cooler regions. In Scandinavia, where temperatures were known to plunge below freezing in the winter, cod (known as “stockfish”) were left out to dry in the cold air, usually after they were gutted and their heads were removed.
Meat could also be preserved through drying, usually after cutting it into thin strips and lightly salting it. In warmer regions, it was a simple matter to dry meat under the hot summer sun, but in cooler climates, air drying could be done at most times of the year, either outdoors or in shelters that kept away the elements and flies.
Preserving Foods With Salt
Salting was the most common way to preserve virtually any type of meat or fish, as it drew out the moisture and killed the bacteria. Vegetables might be preserved with dry salt, as well, though pickling was more common. Salt was also used in conjunction with other methods of preservation, such as drying and smoking.
One method of salting meat involved pressing dry salt into pieces of meat, then layering the pieces in a container (like a keg) with dry salt completely surrounding each piece. If meat was preserved this way in cold weather, which slowed down the decomposition while the salt had time to take effect, it could last for years. Vegetables were also preserved by layering them in salt and placing them in a sealable container such as an earthenware crock.
Another way to preserve food with salt was to soak it in a salt brine. While not as effective a long-term method of preservation as packing in dry salt, it served very well to keep food edible through a season or two. Salt brines were also part of the pickling process.
Whatever method of salt preservation was used, the first thing a cook did when he got ready to prepare the salted food for consumption was soaking it in fresh water to remove as much of the salt as possible. Some cooks were more conscientious than others when it came to this step, which could take several trips to the well for fresh water. And it was next to impossible to remove all the salt, no matter how much soaking was done. Many recipes took this saltiness into account, and some were designed specifically to counteract or complement the salt flavor. Still, most of us would find preserved medieval food much saltier than anything we’re used to today.
Smoking Meat and Fish
Smoking was another fairly common way to preserve meat, especially fish and pork. Meat would be cut into relatively thin, lean strips, immersed briefly in a salt solution and hung over a fire to absorb the smoke flavoring as it dried — slowly. Occasionally meat might be smoked without a salt solution, especially if the type of wood burned had a distinctive flavoring of its own. However, salt was still very helpful because it discouraged flies, inhibited the growth of bacteria, and hastened the removal of moisture.

Pickling Foods
Immersing fresh vegetables and other foods in a liquid solution of salt brine was a fairly common practice in medieval Europe. In fact, although the term “pickle” didn’t come into use in English until the late Middle Ages, the practice of pickling goes back to ancient times. Not only would this method preserve fresh food for months so that it could be eaten out of season, but it could infuse it with strong, piquant flavors.
The simplest pickling was done with water, salt and an herb or two, but a variety of spices and herbs as well as the use of vinegar, verjuice or (after the 12th century) lemon led to a range of pickling flavors. Pickling might require boiling the foods in the salt mixture, but it could also be done by simply leaving the food items in an open pot, tub or vat of salt brine with the desired flavorings for hours and sometimes days. Once the food had been thoroughly infused by the pickling solution, it was placed in a jar, crock, or other airtight container, sometimes with a fresh brine but often in the juice in which it had marinated.
Confits
Although the term confit has come to refer to virtually any food that has been immersed in a substance for preservation (and, today, can sometimes refer to a type of fruit preserve), in the Middle Ages confits were potted meat. Confits were most usually, but not solely, made from fowl or pork (fatty fowl like goose were particularly suitable).
To make a confit, the meat was salted and cooked for a very long time in its own fat, then allowed to cool in its own fat. It was then sealed up — in its own fat, of course — and stored in a cool place, where it could last for months.
Confits should not be confused with comfits, which were sugar-coated nuts and seeds eaten at the end of a banquet to freshen the breath and aid the digestion.
Sweet Preserves
Fruits were often dried, but a far more tasty method of preserving them past their season was to seal them up in honey. Occasionally, they might be boiled in a sugar mixture, but sugar was an expensive import, so only the cooks of the wealthiest families were likely to use it. Honey had been used as a preservative for thousands of years, and it wasn’t limited to preserving fruit; meats were also stored in honey on occasion.
Fermentation
Most methods of preserving food involved stopping or slowing down the process of decay. Fermentation accelerated it.
The most common product of fermentation was alcohol — wine was fermented from grapes, mead from honey, beer from grain. Wine and mead could keep for months, but beer had to be drunk fairly quickly. Cider was fermented from apples, and the Anglo-Saxons made a drink called “perry” from fermented pears.
Cheese is also a product of fermentation. Cow’s milk could be used, but the milk from sheep and goats was a more common source for cheese in the Middle Ages.
Remember… back in those days, there was no electricity… no refrigerators… no law enforcement… and certainly no grocery store or supermarkets… Some of these exceptional skills are hundreds of years of old and they were learned the hard way by the early pioneers.
Today is your chance to be part of saving our ancestors’ lost ways. I wanted to make this information available to every family out there without having to spend years of their lives or thousands of dollars.
So I came up with this great idea to edit all my manuscripts and to turn all this lost knowledge into one of the greatest books of this century:
The Lost Ways
Saving Our Forefathers’ SkillsHere are some of my favorite canning recipes. I guess they are my favorites because I grow many of these items myself in my garden and orchard. You can also find literally hundreds of canning recipes, and more information on canning techniques in The Lost Ways
Freezing and Cooling
The weather of the greater part of Europe throughout much of the Middle Ages was rather temperate; in fact, there is often some discussion of the “medieval warm period” overlapping the end of the Early Middle Ages and the beginning of High Medieval Europe (the exact dates depend on who you consult). So freezing was not an obvious method of preserving foods.
However, most areas of Europe did see snowy winters, and freezing was at times a viable option, especially in northern regions. In castles and large homes with cellars, an underground room could be used to keep foods packed in winter ice through the cooler spring months and into the summer. In the long, frigid Scandinavian winters, an underground room wasn’t necessary.
Supplying an ice-room with ice was a labor-intensive and sometimes travel-intensive business, so it was not particularly common; but it wasn’t completely unknown, either. More common was the use of underground rooms to keep foods cool, the all-important last step of most of the above preservation methods.
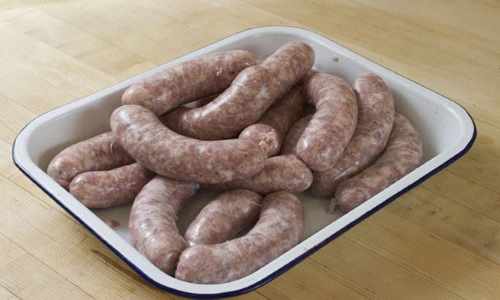
What food could be easier to love than the farmer sausage? To begin with, it’s a fine and humble meat with a proud history. Its modest beginning is proof that the mother of invention is necessity. Farmers sausage came about through the simply, economic need to preserve food for a later date. Using mild spices and clever smoking techniques made it possible to cure meat, extend its usefulness and ensure a long and healthy shelf life.
The way we make it at Pioneer Meat some might even call it elegant. Made from fresh ground pork, combined with spices and carefully processed to perfection, Pioneer farmers sausage is, well, perfectly simple. It’s lean, has no filler and, by the standards of food lovers, is a true classic beauty.
It is also incredibly accommodating. Our farmers sausage can perform solo as a delicious meal or will happily blend with almost any ingredients for the perfect dining ensemble. For example, you can use farmers sausage to make:
sausage scramble for breakfast
perogy casserole for lunch
creamy fettucine for dinner
sage buttermilk biscuits with minestrone for a snack
And this is just the tip of the iceberg when it comes to cooking. Farmers sausage just goes with everything. Sounds like a love story, doesn’t it?
Homemade Sausage
1 lb. Lean hamburger (or pork, if you prefer)
1 ¼ tsp. salt
1 tsp. ground sage
½ tsp. black pepper
1/8 tsp. ground cloves
Mix together, preferably the night before so that the flavors are more developed. I fry these little patties of yummy sausage on a medium low heat. Because I use leaner meat, I cook it slower so that it doesn’t get too tough. If you use a fattier meat, like ground pork, you won’t have that problem (but it isn’t as healthy that way).
A Quality Sausage Doesn’t Need Expensive Meat
Now’s the time to get a few things off my chest and cut through the marketing drivel that you see from sausage makers.
“We only use the prime cuts of meat” – The fundamental reason for the sausage was to use up the remains of the carcass so that there was no waste following slaughter. Moreover, you are grinding up the meat so selecting the more tender cuts of the animal is irrelevant.
- Pork – Shoulder, belly and head trim are fine
- Beef – Chuck or Flank
- Lamb – Neck fillet, mutton
- Chicken – Leg including the skin
“Made From The Finest Rare Breed Pigs” – Now I’m not going to deny that rare breed pork is succulent, tender and with a better defined fat marble in the meat and that’s fine and dandy if you’re eating a pork chop or steak…but this is sausage. We’re adding seasoning for flavour and we’re controlling the the meat / fat ratio ourselves. Rare bread pigs are more expensive to rear (that’s why they are rare) there’s no need to use them for making homemade sausage.
Fat
Sausage needs a fat content so get over it. Fat plays an important part in the science of both making and cooking sausage, fat is important for the flavour, fat is important for the juiciness. If you want a sausage with half the fat of a regular sausage, just eat half the quantity.
Yes I will give you some low fat sausage recipes but in my book they are still the poor relation to a good quality homemade sausage.
That said, making homemade sausage gives you the choice over what fat to use. For example, if making sausage using poultry you might want to add pork fat because it has a higher melting point than poultry fat which is important when it comes to cooking. Likewise game fat isn’t to everyone’s taste and there is precious little of it on game meat anyway so the addition of pork fat is advisable.
At Carnivore’s Bible , it really is. We love what we make. We love how we make it. We love how you enjoy it. And we love giving you hundreds of ideas for cooking it.
Carnivore’s Bible is a well known meat processor providing custom meat processing services locally and across the state of Montana and more. Whether your needs are for domestic meat or wild game meat processing, Carnivore’s Bible is your ideal choice.

Side Pork and Mormon Gravy
Mormon gravy, common fare among the early settlers and apparently a creation of necessity expressly for the times, is still hearty and nourishing for many of this generation who like to make it with ground beef or frizzled ham or bacon and serve it over baked potatoes.
Ingredients
8 thick slices side pork (or thick-cut bacon strips)
4 tablespoons meat drippings
3 tablespoons flour
2 cups milk
Salt, pepper, paprika
Directions
Cook meat on both sides in heavy frying pan until crisp. Remove from pan and keep warm. Measure fat and return desired amount to skillet. Add flour and brown slightly. Remove from heat and add milk, stirring well to blend. Return to heat and cook and stir until mixture is thick and smooth. Season to taste. Serve with side pork on potatoes, biscuits, cornbread, or even pancakes.

Meat and Potato Pie
Ingredients
2 tablespoons shortening
1-1/2 cups biscuit/baking mix
3 to 4 tablespoons cold water
FILLING:
1-1/2 pounds ground beef
1 medium onion, chopped
1 can (10-3/4 ounces) condensed cream of mushroom soup, undiluted
1/2 teaspoon salt
1/2 teaspoon dried rosemary, crushed
1/2 teaspoon dried thyme
1 can (15 ounces) sliced carrots, drained
1 can (8 ounces) mushroom stems and pieces, drained
2 cups hot mashed potatoes (prepared with milk and butter)
1/2 cup sour cream
1/2 cup shredded cheddar cheese
Directions
In a small bowl, cut shortening into biscuit mix until the mixture resembles coarse crumbs. Add the water, 1 tablespoon at a time, tossing lightly with a fork until dough forms a ball.
On a lightly floured surface, roll out pastry to fit a 9-in. pie plate. Line ungreased pie plate with pastry; trim and flute edges or make a decorative edge. Set aside.
In a large skillet, cook beef and onion over medium heat until meat is no longer pink; drain. Stir in soup and seasonings; bring to a boil. Reduce heat; simmer, uncovered, for 5 minutes.
Pour into pie shell. Top with carrots and mushrooms. Combine potatoes and sour cream; spread over pie. Bake, uncovered, at 425° for 15 minutes. Reduce heat to 350°. Bake 15 minutes longer or until golden brown. Sprinkle with cheese; let stand for 5-10 minutes.
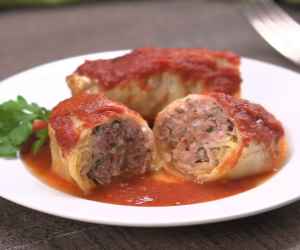
Cabbage Rolls
Ingredients
1 medium head cabbage (3 pounds)
1/2 pound uncooked ground beef
1/2 pound uncooked ground pork
1 can (15 ounces) tomato sauce, divided
1 small onion, chopped
1/2 cup uncooked long grain rice
1 tablespoon dried parsley flakes
1/2 teaspoon salt
1/2 teaspoon snipped fresh dill or dill weed
1/8 teaspoon cayenne pepper
1 can (14-1/2 ounces) diced tomatoes, undrained
1/2 teaspoon sugar
Directions
Cook cabbage in boiling water just until outer leaves pull away easily from head. Set aside 12 large leaves for rolls. In a small bowl, combine the beef, pork, 1/2 cup tomato sauce, onion, rice, parsley, salt, dill and cayenne; mix well.
Cut out the thick vein from the bottom of each leaf, making a V-shaped cut. Place about 1/4 cup meat mixture on a cabbage leaf; overlap cut ends of leaf. Fold in sides. Beginning from the cut end, roll up. Repeat.
Slice the remaining cabbage; place in an ovenproof Dutch oven. Arrange the cabbage rolls seam side down over sliced cabbage. Combine the tomatoes, sugar and remaining tomato sauce; pour over the rolls. Cover and bake at 350° for 1-1/2 hours or until cabbage rolls are tender.
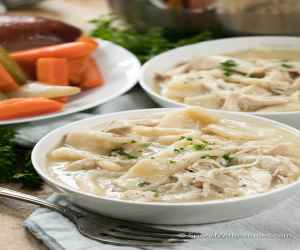
CHICKEN AND DUMPLINGS
Ingredients
20 servings
400 cals
On Sale
What’s on sale near you.
On
7 pounds cut up chicken pieces4 cups chicken stock2 onions, chopped3 stalks celery, chopped3 teaspoons salt1 egg1/4 cup milk
1 1/2 cups all-purpose flour, divided1 1/2 teaspoons baking powder2 tablespoons unsalted butter2 tablespoons chopped fresh parsley1 cup water1/2 teaspoon ground black pepper
Directions
In a large pot place chicken pieces and add the chicken stock, onion, celery and 2 teaspoons of the salt. Put heat on medium low and simmer, partially covered, 15 to 20 minutes or until chicken is tender.
To Prepare Dumplings: In a large mixing bowl beat together the egg and milk. Add 1 cup flour, remaining salt and baking powder and mix all together. Cut the butter into the flour mixture until the mixture is crumbly. Add 1 tablespoon of the parsley and mix. In 6 large spoonfuls, drop dumpling mixture onto the top of the simmering chicken. Cover the pot and let all simmer for 10 minutes more.
To Make Gravy: Remove chicken and dumplings to a large serving bowl. Cover and set aside, keeping warm. Strain the stock left in the pot, pressing out any ‘veggie liquid’. Return stock to pot. Combine water with remaining flour, then stir into the strained stock. Bring all to a boil, stirring constantly, to thicken. Return chicken and dumplings to pot, combing all gently. Serve with remaining parsley.
A grand encyclopedia of country Carnivore’s Bible , weather wisdom, country remedies and herbal cures, cleaning solutions, pest purges, firewood essentials, adobe making and bricklaying, leather working, plant dyes, farm foods, natural teas and tonics, granola, bread making, beer brewing and winemaking, jams and jellies, canning and preserving, sausage making and meat smoking, drying foods, down-home toys, papermaking, candle crafting, homemade soaps and shampoos, butter and cheese making, fishing and hunting secrets, and much more. Carnivore’s Bible : Traditional Skills for Simple Living
Books can be your best pre-collapse investment.
Carnivore’s Bible: (You’ll discover the ancient meat preservation method that will make your mouth water. Enjoying the delicious sweet-smoky taste of beef, pork, or link sausages for months to come… without ANY refrigeration, chemicals, preservatives, or additives!)
The Lost Ways (Learn the long forgotten secrets that helped our forefathers survive famines,wars,economic crisis and anything else life threw at them)
Survival MD (Best Post Collapse First Aid Survival Guide Ever)
Conquering the coming collapse (Financial advice and preparedness )
Liberty Generator (Build and make your own energy source)
Backyard Liberty (Easy and cheap DIY Aquaponic system to grow your organic and living food bank)
Bullet Proof Home (A Prepper’s Guide in Safeguarding a Home )
Family Self Defense (Best Self Defense Strategies For You And Your Family)
Survive Any Crisis (Best Items To Hoard For A Long Term Crisis)
Survive The End Days (Biggest Cover Up Of Our President)